Netgear Aircard 800s vs Aircard 810S

As a popular series of LTE gadgets, Netgear 4G aircards are well-known many countries in Europe and the United States. Especially the hot Netgear Aircard 810s mobile hotspot, is the best seller for LTE advanced networks. Recently, Netgear provided a new 4G LTE mobile router Aircard 800s for Australian network provider Optus and Optus named it as Optus WiFi modem 800s. If this article, we will review the difference between the two mobile hotspots and see which one is better.

Netgear AC810S VS 800S Appearance and Interfaces

The Netgear AC810 has a 2.4 inch touchscreen on the front with two buttons for option: home and back. We have Aircard 810 in the version of Telstra WI-FI 4GX Advanced III.  But it’s already unlocked for global use. The Telstra Aircard 810 has the logo on the top side of the front. On the back, the Netgear logo is on the back cover, which could be removed to insert SIM card and battery. The Aircard 800s has similar features, on the front, there is a 2.4 inch touchscreen and Optus logo. Two buttons (home and back buttons) are available at the side of the screen. The Netgear logo is on the back cover, which could also be removed for changing SIM card or battery. And they both have two connectors for an external antenna. And the connector type is TS-9. They both use Micro SIM card to get WLAN network for internet access.


The Netgear Aircard 810s is available for Telstra in black color and Optus 4G WiFi modem is in white color.

Netgear Aircard 800s vs Aircard 810s Specifications and features

From the appearance, we can see the color difference, but can’t get other difference. It seems they are made by the same model. Let’s looks at the Specifications of Aircard 810s and 800s and see what the real difference is for buyers and users.


Model Netgear Aircard 810s Netgear Aircard 800S
Product type LTE Mobile Hotspot LTE Mobile Hotspot
Category LTE Cat.11 LTE Cat.9
Chipset Qualcomm Snapdragon X12 Qualcomm MDM9240
Data rates DL 600Mbps/UL 100Mbps DL 450Mbps/UL 50Mbps
Supported 4G LTE frequency bands B1, B3, B7, B8, B28 B1, B3, B7, B28, B40
WLAN 802.11a/b/g/n/ac, dual-band 2.4GHz & 5GHz 802.11a/b/g/n/ac, dual-band 2.4GHz & 5GHz
Max support users 15 users 15 users
MIMO 2 x 2 MIMO 2 x 2 MIMO
Connector for external antenna Two, TS-9 jacks Two, TS-9 jacks
Buy Antenna Aircard 810s External Antenna Aircard 800s External Antenna
App management Netgear Aircard APP Netgear Aircard APP
SIM type Micro SIM Micro SIM
Battery 2930 mAh 2930 mAh
Dimensions 112 x 68.6 x 15.45mm 110 x 68 x 16.1 mm
Ethernet Port No No
Datasheet download Netgear AC810S Datasheet Netgear AC800S Datasheet
User Manual Telstra 4GX Advanced III Manual Optus 4G modem 800S Manual
Other features 3 band CA 3 band CA
Reviews Netgear Aircard 810s review Netgear Aircard 800s review
Price 229.00USD 199.00USD

Aircard 800s vs 810S Conclusion

From table for the Aircard 810s specs and Aircard 800s specs, the Netgear 810s is more advanced with Qualcomm Snapdragon X12 chipset which can achieve download speed up to 600Mbps. Netgear Aircard 800s is also good to mention with Qualcomm MDM9240 chipset which could support download speed to 450mbps. They support same LTE frequency band B1, B3, B7, B28, but Aircard 810s supports band 8 while Aircard 800s supports band 40, which means the Aircard 810s can’t support TDD-LTE network. Other features of the two Netgear 4G mobile hotspots are same as described. Since the Netgear AC810S is more advanced, the price is a little bit higher than that of Aircard 800s. If you would buy a Netgear 4G Router between the two models, first, you need check whether the Aircard 810s or 800s would be compatible with your network provider’s network, and then you need to consider the price. The real performance of the two hotspots 4G has no much obvious difference.


Netgear Nighthawk M1 VS Netgear Aircard 810s

After the release of Netgear Aircard 810s, Netgear then presents the fastest mobile WiFi hotspot Nighthawk M1. The two mobile WLAN hotspots are well-known because they are with very fast LTE modems, which makes Netgear Wireless dominates the wireless gadgets equipment. Based on Qualcomm high-level chipset, the AirCard 810 Hotspot can achieve downlink up to 600 Mbit/s while the Nighthawk M1 can even reach up to 1 GBit/s in the downlink. The Nighthawk M1 also has the advanced features, but even the AirCard 810 hotspot has its advantages, as this comparison shows.

The Netgear AirCard 810 LTE Router has been available in many countries for a few years. When it’s first available in the market, it’s the fastest LTE hotspot (LTE Cat11, up to 600 Mbit/s). In our test, the AC810 proves its ability for wireless connection. The Netgear Nighthawk M1 is to be regarded as a direct successor to the AirCard 810 hotspot and has been officially available in the market since the second half of 2017. However, the concept of the AirCard series was only partially continued, and the Nighthawk open a new series for Netgear LTE advanced Pro gadgets.

Appearance and Interfaces

The design of the two Netgear LTE hotspots is very different. The AirCard 810 router is significantly smaller than the Nighthawk M1, but still comparatively large for a mobile LTE hotspot. The big touchscreen display on the front of the AC810 catches the eye. The Nighthawk M1 also has a very eye-catching display, but the round screen has no touch function. On the display, the AirCard 810 router seems has more advantages.


In terms of connections, the Nighthawk M1 mobile router is far ahead than Aircard 810. In addition to USB Type C for charging and connecting to the computer, the M1 offers a standard USB port for use as a power bank (charging other devices) as well as an RJ45 Gigabit Ethernet LAN port. Both WLAN hotspots are equipped with two TS-9 connections, to which an external mobile radio antenna can be connected. The battery is changeable in both devices; the Nighthawk M1 has much stronger battery of 5040mAh, compared with the AC810 2930mAh battery capacity. In addition, the two mobile routers use SIM size in Micro SIM card.

LTE modem: Cat.11 VS Cat.16

On the datasheet, the Qualcomm LTE modem in the Netgear Nighthawk M1 is significantly more powerful than the AirCard 810 router. The Nighthawk M1 not only supports up to fourfold channel bundling (4CC CA), but also the 4 × 4 MIMO antenna technology. The AirCard 810 Router can handle a maximum of three carrier aggregation and 2 × 2 MIMO. The 256QAM modulation is available in both two routers.


In practice, the maximum speed was limited more by the mobile network than by the router, so there were hardly any differences between the two devices (tested with unlimited rates from Vodafone and Telekom). However, there were differences in “simple” LTE reception without channel bundling. Here, the Nighthawk M1 was often a little faster on the go. Even in the UMTS network, the Nighthawk M1 has usually made a little faster speed in the downlink than the AC810. By the way, GSM/2G cannot be handled in both hotspots.

WLAN Features

The Netgear Nighthawk M1 offers the slightly better wireless network performance compared to the AirCard 810 router and the slightly better gross data rates, as shown by the test with multiple devices. Both devices support WLAN at dual-band 2.4 GHz and 5 GHz. There is a difference in the maximum number of devices simultaneously connected via WLAN: up to 20 simultaneous users are possible with the Nighthawk M1, only 15 with the AC810.


Both the Netgear AC810 and the Netgear Nighthawk M1 offer a so-called offload function, also known as “WLAN Extender”. As an alternative to the integrated mobile modem, the user can use an existing WLAN connection as Internet access. In the case of the Nighthawk M1, Internet access can alternatively also be established via the RJ45 LAN interface. The offload function is particularly interesting in hotels, at events or in the home and can help to save data volume on the mobile rate.

Operation and software

In terms of operation and configuration, the two Netgear LTE routers differ only minimally. Of course, the AirCard 810 hotspot offers the advantage of the touchscreen display, so some settings can be made conveniently directly on the router. With the Nighthawk M1, you either have to call up the web interface via a browser or use the Netgear Mobile App (available for Android and iOS). If you want to change the AC810 more than just basic things, you have to use the web interface or the app there as well.


The web interface offers a bit more features compared to the Netgear Nighthawk M1, but the AC810 is by no means badly positioned here. Both devices are easy and uncomplicated to use, the app is suitable for less technically savvy users, maybe even better for the operation than the web interface.


Conclusion

In direct comparison, the Nighthawk M1 is clearly the better router. The modem is better and provides for higher data rates than average, there is a RJ45 LAN connection and the battery has been improved significantly compared to the AirCard 810 again. The waiver of a touch screen is a pity, even though, it’s still given the high price of around 459.00USD. With WLAN, the Nighthawk M1 also offers advantages over the AC810, the range is slightly better and the data rates are higher in many situations.


Anyone who is prepared to pay the currently quite high price, clearly gets the better mobile hotspot Nighthawk M1. But the AirCard 810 router is still far from being old-fashioned: Compared to the Nighthawk M1, the 810s aircard offers a more compact and pocket-compatible size and can be operated via touchscreen. You do not have to know too much about the technology, the software is largely identical. For around 250USD, you will not get disappointed with the AC810.


Five Huawei Mobile Hotspots with Ethernet Port to Recommend

A few years ago, Huawei presented its first mobile 3G router with Ethernet port Huawei E5151 (In China, it’s called Huawei E5 LAN). Now many mobile hotspots with Ethernet connection are available from many vendors. Today, we would like to review five Huawei mobile hotspots with Ethernet port, including Huawei 3G mobile WiFi hotspot with Ethernet port and Huawei 4G Mobile Hotspots with Ethernet Port.

Huawei E5885

Why people need a 3G/4G hotspot with Ethernet port?

Usually, many people use 3G mobile hotspots or 4G mobile hotspots on the go. The mobile hotspots usually have a SIM card slot, so that users can connect to the hotspot wirelessly. However, if the SIM card signal is not available or only Ethernet connection is available, it’s the show time for the mobile hotspot with Ethernet port. And the business people or somebody who usually travel overseas may face this trouble. In this situation, you may need a 3G/4G LTE hotspot with Ethernet port.


Best Seller – Huawei 3G/4G Mobile Hotspot with Ethernet Port

  1. Huawei E5885 (Also named Huawei Mobile WiFi Pro 2)
  2. Huawei E5770 (Also named Huawei Mobile WiFi Pro)
  3. Huawei E5730
  4. Huawei E5351
  5. Huawei E5151
Huawei E5770 in black and Huawei E5730 in white

From the name, you may don’t know what the difference is between the five mobile hotspots with Ethernet port. The Huawei E5885 and E5770 are two 4G mobile hotspots with Ethernet port while the rest three models(E5730, E5351 and E5151) are 3G mobile hotspots. We make the table below about the specs and features of the five mobile routers for your reference. Let’s see the Huawei 4G mobile hotspots with Ethernet port:

Huawei 4G Mobile Hotspot with Ethernet Port

Model Huawei E5885 Huawei E5770
Product type LTE Mobile Hotspot LTE Mobile Hotspot
Category LTE Cat.6 LTE Cat.4
Data rates DL 300Mbps/UL 50Mbps DL 150Mbps/UL 50Mbps
Supported 4G LTE frequency bands * FDD-LTE: Band 1/2/3/4/5/7/8/19/20/28
* TDD-LTE: Band 38/40/41/42
Band 1/3/5/7/8/20/38
Supported 3G frequency bands B1/B2/B4/B5/B6/B8/B19 850/900/1900/2100MHz
WiFi 802.11a/b/g/n/ac, dual-band 2.4GHz & 5GHz 802.11b/g/n, 2.4GHz
Max support users 32 users 11 users
MIMO 2 X 2 MIMO 2 X 2 MIMO
Connector for external antenna No connector No connector
Ethernet Port Single WAN/LAN port(RJ-45) Single WAN/LAN port(RJ-45)
App management Huawei Hilink APP Huawei Hilink APP
SIM type Micro SIM Micro SIM
Battery Non-removable, 6400mAh Non-removable, 5200mAh
Dimensions  112.00 x 69.20 x 23.00mm 106.0 mm × 68.4 mm × 22.5 mm
USB port Input & Output Input & Output
Datasheet Huawei E5885 Datasheet Huawei E5770 Datasheet
User Manual Huawei E5885 Manual Huawei E5770 Manual
Supported Carriers AT&T, T-mobile, Verizon, Rogers, Telus, Telstra,  Vodafone, Orange, Airtel, MTC, MTN, Vodacom etc.. Including other carriers in Europe, Africa, Middle East, Aisa. Mainly for Europe, Asia, Middle East, Africa, not working well in American areas on 4G/LTE
Review Huawei E5885 Review Huawei E5770 Review
Price/USD 299.00USD 229.00
Huawei E5351

And below is the Huawei 3G Mobile Hotspot with Ethernet Port:

Huawei 3G Mobile Hotspot with Ethernet Port

Model Huawei E5730 Huawei E5351 Huawei E5151
Product type 3G Mobile Hotspot 3G Mobile Hotspot 3G Mobile Hotspot
Data rates DL 42Mbps/UL 5.76Mbps DL 42Mbps/UL 5.76Mbps DL 21Mbps/UL 5.76Mbps
Supported 4G LTE frequency bands n/a n/a n/a
Supported 3G frequency bands 900/2100MHz 900/2100MHz 900/2100MHz
WiFi 802.11b/g/n, 2.4GHz 802.11b/g/n, 2.4GHz 802.11b/g/n, 2.4GHz
Max support users 10 users 10 users 10 users
MIMO n/a n/a n/a
Connector for external antenna No connector No connector No connector
Ethernet Port Single WAN/LAN port(RJ-45) Single WAN/LAN port(RJ-45) Single WAN/LAN port(RJ-45)
App management Huawei Hilink APP Huawei Hilink APP Huawei Hilink APP
SIM type Standard SIM Standard SIM Standard SIM
Battery Non-removable, 5200mAh Removable, 1500mAh Removable, 1500mAh
Dimensions 99.0mm×66.3mm×22.5mm 92.8mm x 63.5mm x 16.3mm 92.8mm x 63.5mm x 16.3mm
USB port Input & Output Input Input
Datasheet Huawei E5730 Datasheet Huawei E5351 Datasheet Huawei E5151 Datasheet
User Manual Huawei E5730 Manual Huawei E5351 Manual Huawei E5151 Manual
Supported Carriers Mainly for Europe, Asia, Middle East, Africa, not working well in American areas on 4G/LTE Mainly for Europe, Asia, Middle East, Africa, not working well in American areas on 4G/LTE Mainly for Europe, Asia, Middle East, Africa, not working well in American areas on 4G/LTE
Review Huawei E5730 Review Huawei E5351 Review Huawei E5151 Review
Price/USD 148.00 139.00 139.00
HUAWEI E5151 Ethernet port
Huawei E5151

They are the best sellers of Huawei Mobile Hotspots with Ethernet port. The Ethernet Port in the devices is for WAN & LAN. Here now, there are many mobile hotspots with Ethernet from other manufacturers, but some of them are only for LAN, not for WAN, which means you can only connect to the network via 4G SIM card. You cannot connect to WLAN network via Ethernet port.


The above mobile hotspots with Ethernet port support LTE to LTE-A networks, and 3G mobile hotspots available. You may find one for yourself if you have demand for such functions. And we have to mention that the large battery capacity in the Huawei E5885, E5770, and E5730, which can also charge other devices such as smartphones, gadgets etc…This could also be praised for the practical function.

Netgear Nighthawk M1 Gigabit LTE Router Test

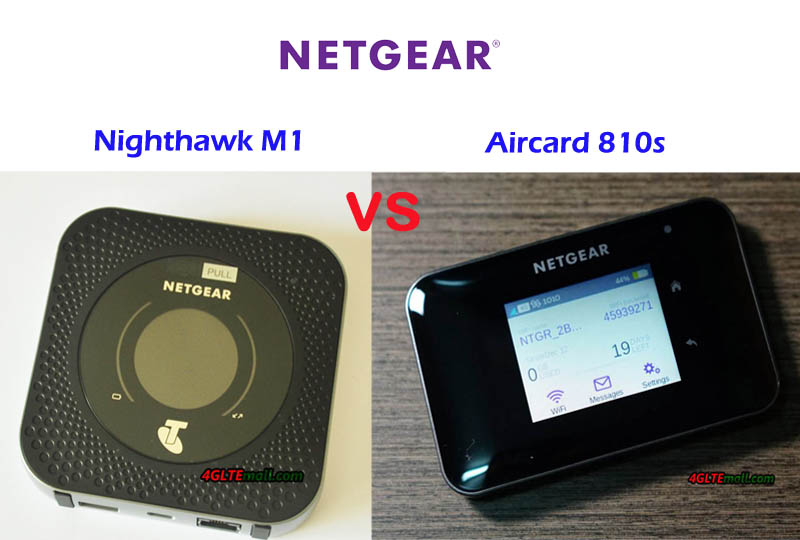
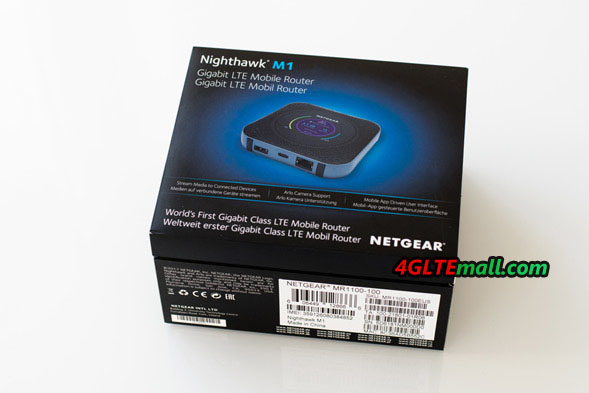
Netgear Nighthawk M1 LTE router with the model number MR1100 was available first in Australia for Telstra, and then in USA for AT&T. Now it’s available for some carriers in Europe. The LTE advanced Pro mobile hotspot is equipped with a Gigabit LTE modem from Qualcomm and offers very good equipment with RJ45 LAN port, power bank function and large, removable battery. In this test, we will see whether the device will work as good in practice as the datasheet suggests and whether it is a worthy successor to the AirCard 810 hotspot.

Appearance and first impression


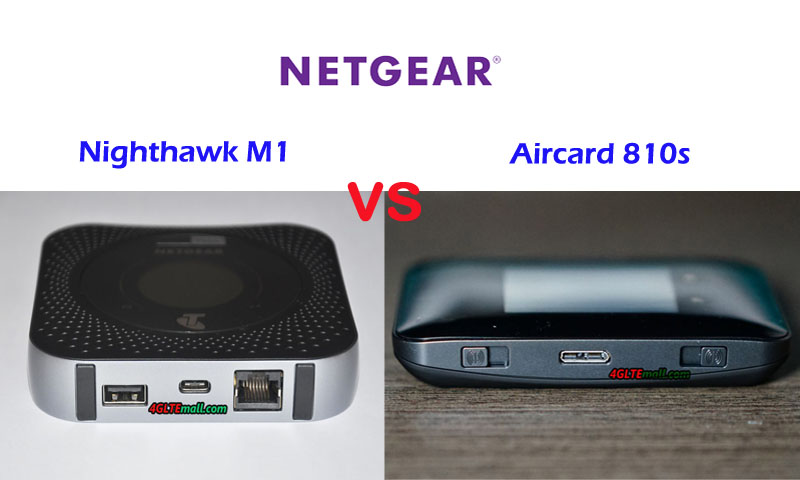
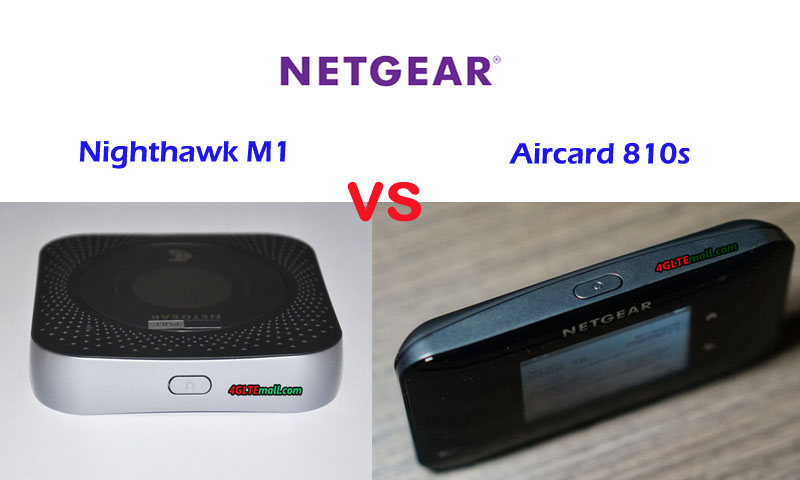
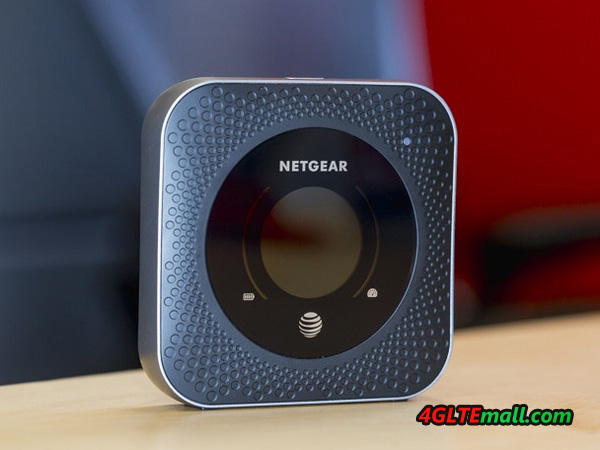
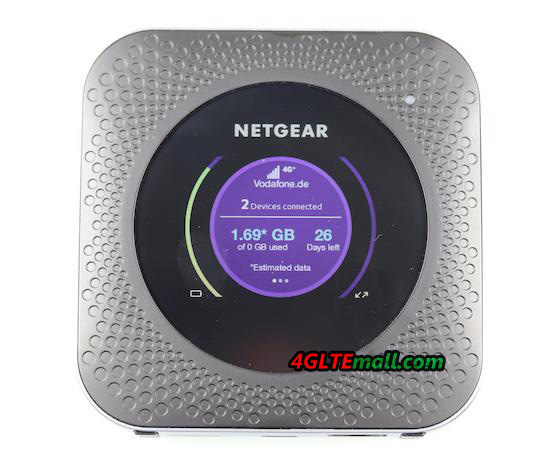
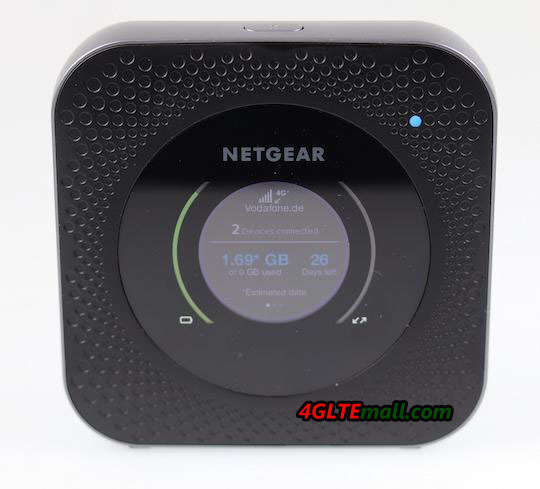
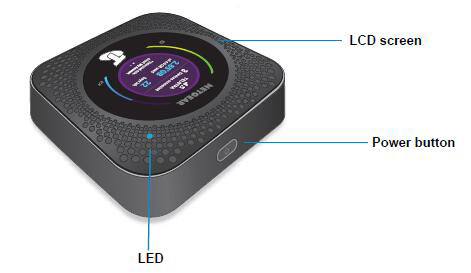
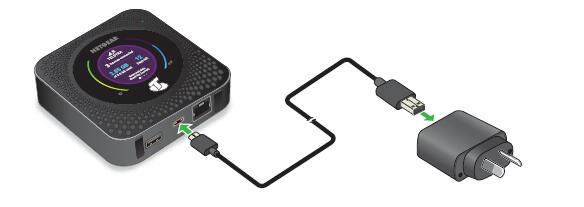
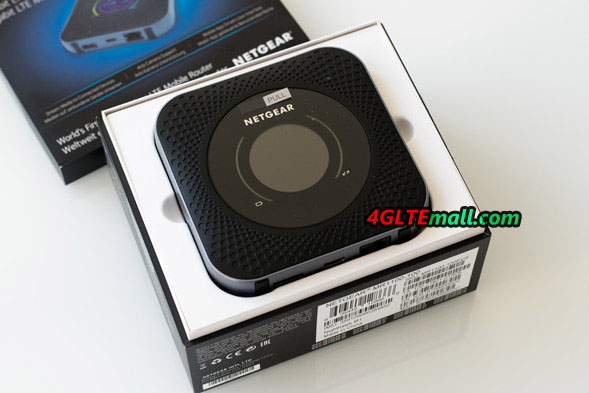
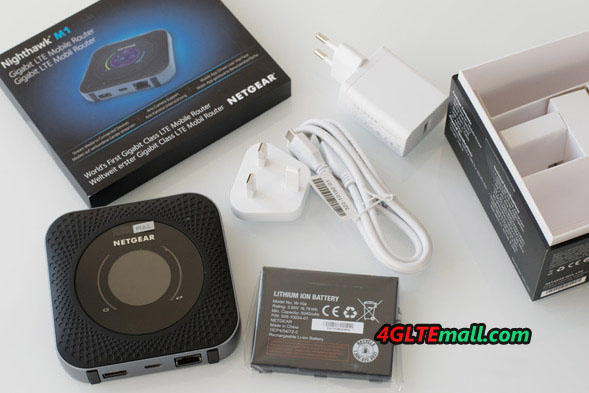
In Australia, the Netgear Nighthawk M1 has been available since about March 2017, but the European version with the model number MR1100-100EUS is designed specifically for the European market and supports the LTE frequency bands used in these countries. In addition to the Nighthawk M1 router itself, you will also find a quick start guide, a USB Type C cable, and a power supply. The first impression after unpacking the Nighthawk M1: the router is really big, significantly larger than other Netgear 4G mobile Wi-Fi hotspots. After switching on, then immediately falls on the round display, which is a nice design element. The workmanship works well; everything is tight, so as the battery cover.

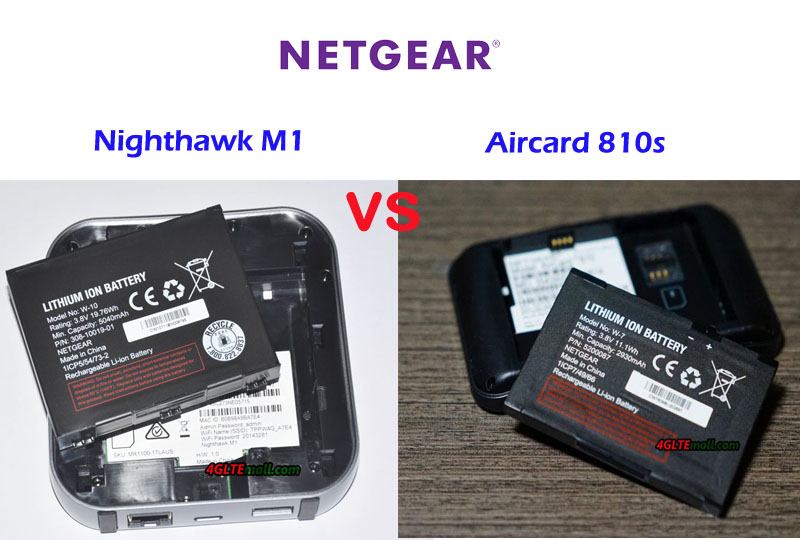
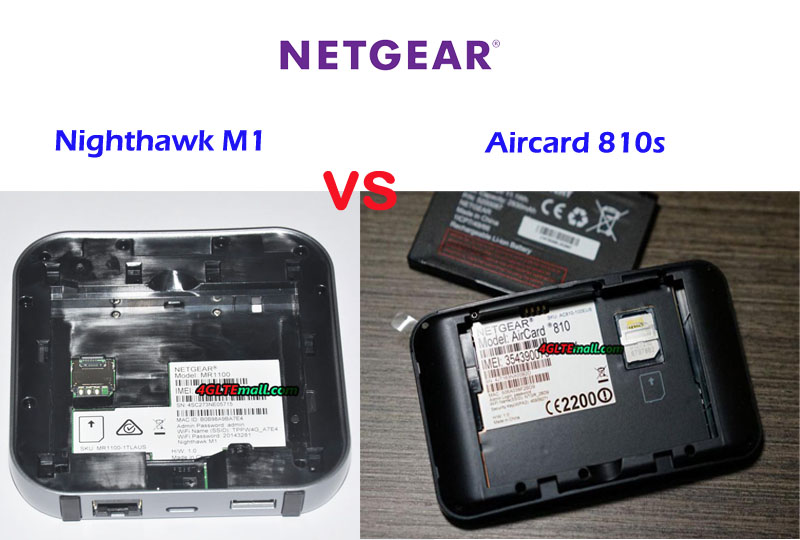
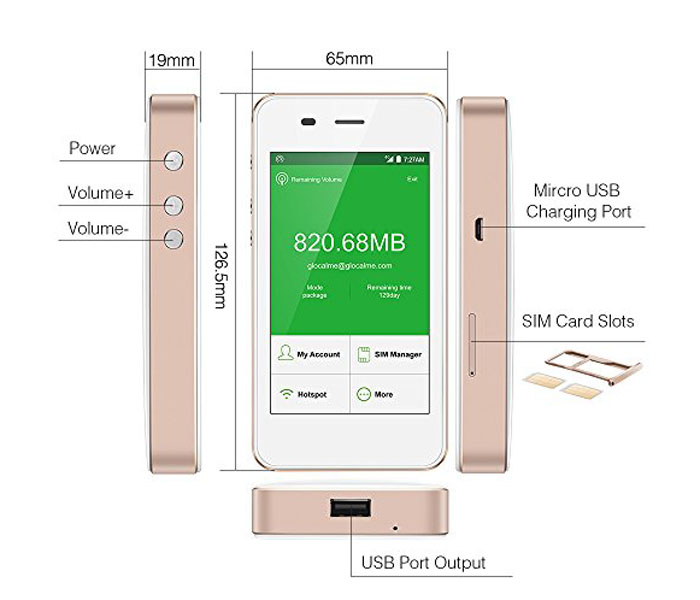
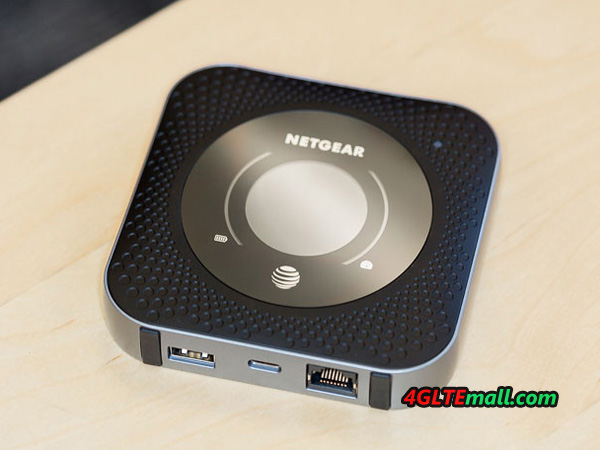
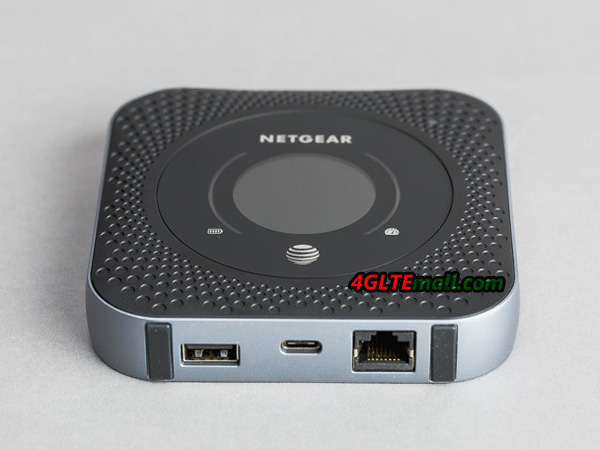
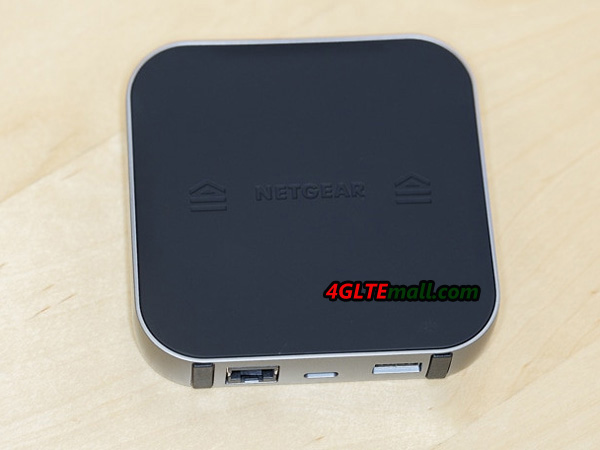
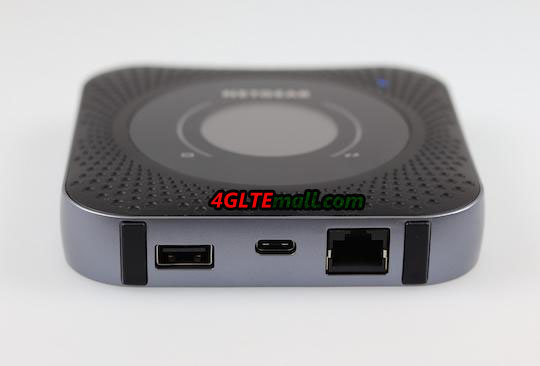
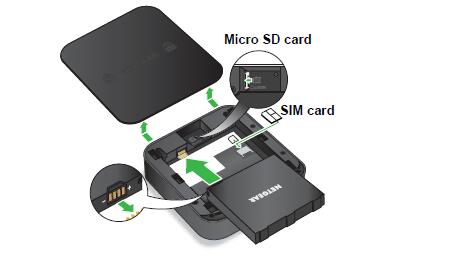
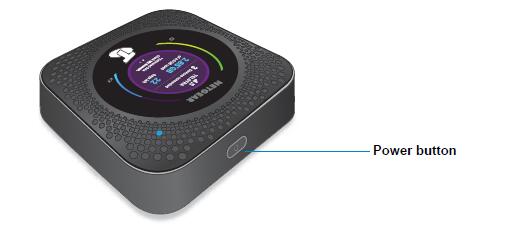
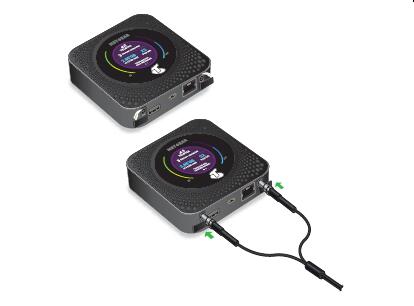
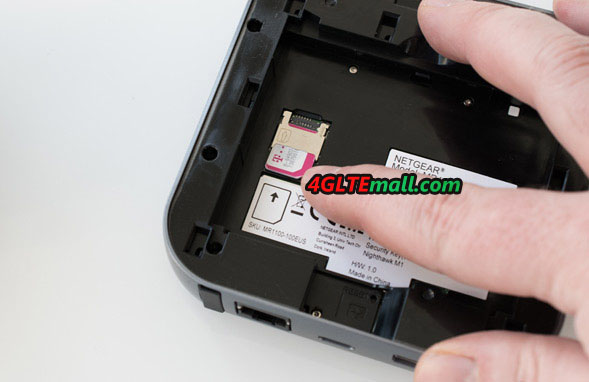
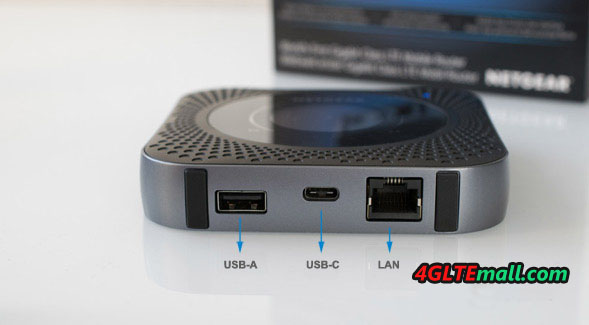
There is a power button at the top of the device. This provides a good pressure point but must be pressed for an exceptionally long time to turn the Nighthawk router on or off. On the bottom, there is a USB Type C port for charging the hotspot and for connecting to the PC, a USB Type A port for charging other devices, an RJ45 LAN port and two TS-9 ports for an external antenna. The battery has a capacity of a proud 5,040 mAh and is easily changeable by the user. Underneath the battery is the slot for the SIM card (3FF Micro SIM form factor) and a slot for a Micro SD memory card.

Since the Nighthawk M1 has a different body form and a different USB connection than the predecessors of the Netgear AirCard series, the router is also not compatible with the docking station DC112A AirCard Smart Cradle. This is, of course, annoying if you already own the expensive docking station and now wants to change to the Nighthawk M1.


Gigabit LTE modem for DL 1Gibt/s


The Netgear Nighthawk M1 integrated mobile modem can use LTE Cat16 with up to 1 Gbit/s in the downlink and up to 150 Mbit/s in the uplink. This is made possible by support for various 4.5G technologies such as 4 × 4 MIMO antenna technology, 4CC CA (Carrier Aggregation ) and 256QAM modulation. In addition, 3G/UMTS is supported with up to 42.2 Mbps in the downlink and 5.76 Mbps in the uplink (DC-HSPA+). However, the Nighthawk M1 doesn’t support 2G GSM networks, which may not be bad news, because the device does not fall back into a slow network in automatic mode, in which surfing is not fun anyway.

In real use, the speed of up to 1 Gbit/s in the downlink is only very rarely achieved. This must be based on perfect network conditions given accordingly, which is the case only in a few places. The various 4.5G technologies help the router to provide higher speeds even with slower LTE radio cells, for example, provides the 256QAM support for up to 33% higher data rate in the downlink.

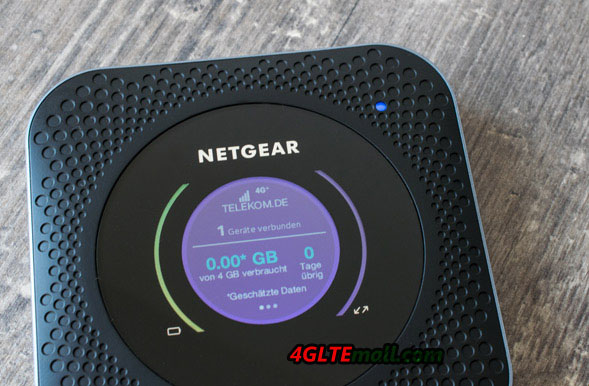
In testing with a Telekom SIM card, the Netgear Nighthawk M1 scored in many cases with very good data rates. In an LTE Band 3 radio cell, up to 135 MBit/s in the downlink, up to 64 MBit/s in the uplink and well under 30 milliseconds ping could be measured. In particular, the downlink was higher in various tests than in comparison devices. In the UMTS network, the Netgear Nighthawk M1 also showed an outstanding performance: about 33 MBit/s in the downlink and 4.6 MBit/s in the uplink are technologically almost the maximum performance.

However, the test of the Nighthawk M1 also showed weak spots in regions with activated carrier aggregation, which probably has to be related to the modem firmware. So the Nighthawk router had not used channel bundling in some locations. In particular, it was repeatedly observed that the Nighthawk M1 was booked in the LTE band 8, while the iPhone at the same location LTE Band 3 as a “baseband” and also used band 7 via CA. The data rates were also correspondingly poor: the iPhone reached well over 200 MBit/s, the Netgear M1 only slightly above 20 MBit/s. Only after several reboots changed the Nighthawk M1 on LTE band 3, but seemed to continue to dispense with Carrier Aggregation.

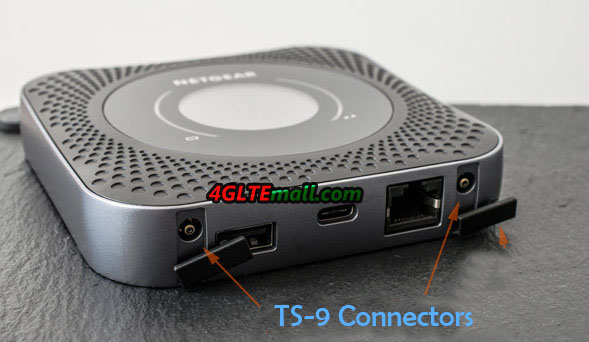
The reception was very good both in the UMTS network and in the LTE network (band 3, band 8 and band 20 tested). If necessary, it is also possible to connect an external antenna. In the test, a 4G LTE Outdoor antenna with two TS-9 pigtails worked very well.


Operation and software


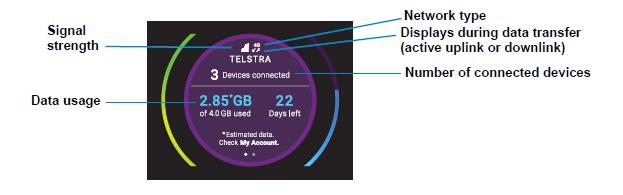
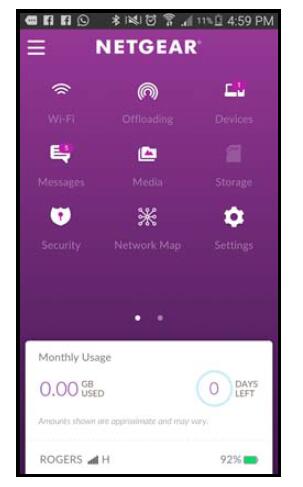
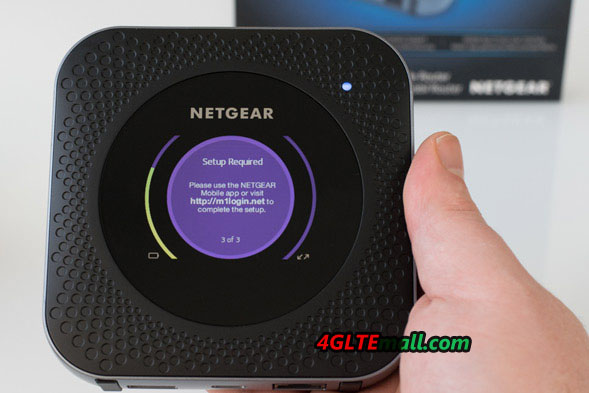
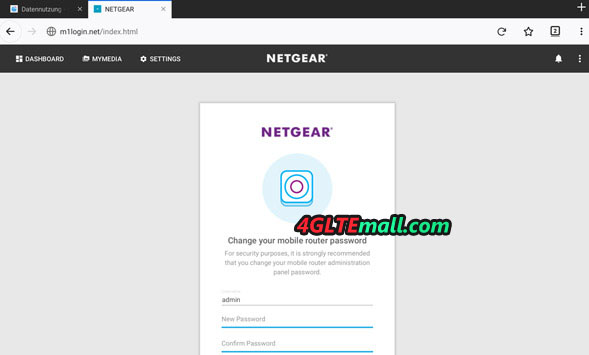
Although the Netgear Nighthawk M1 offers a nice display on the front, this is not a touchscreen and therefore not suitable for operating the device from the screen. The entire configuration is therefore via a web interface or the “Netgear Mobile” app, which is available for Android and iOS. The app is very successful. The design of the web interface and the app is also impressive, you can find your way around quickly and a good compromise between functionality and design.

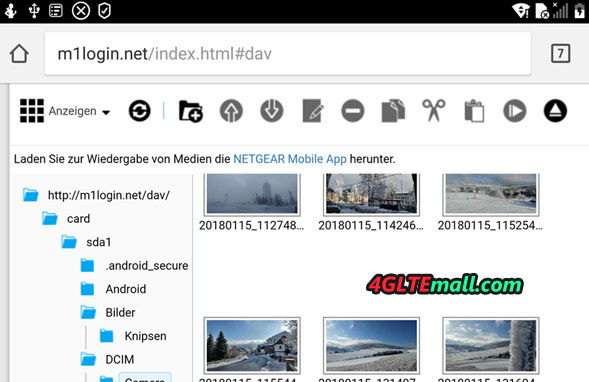
The Netgear Nighthawk M1 router offers various settings. In addition to the “usual” things such as settings for Wi-Fi name and Wi-Fi password, there are also “exotic” things like the display brightness and the illumination duration, which can be adjusted manually. In the area “MyMedia” you can access the data of the MicroSD memory card, provided you have inserted a suitable storage medium. The data can be shared in the network for all participants.

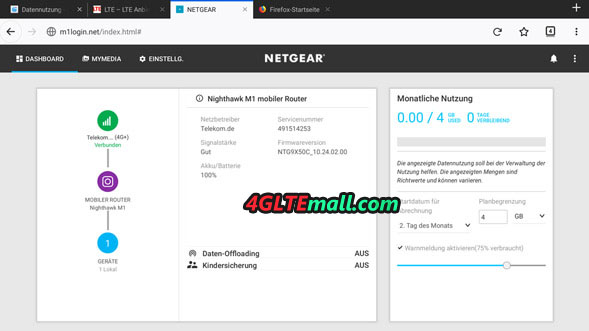
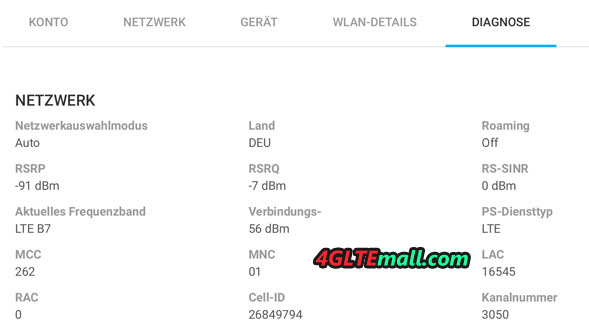
Praiseworthy is also the detail view of the device as well as to the network connection. The “Status” tab shows, for example, the network technology used, the frequency band used, RSRQ and RSRP, and other data. Even the temperature of the device and the battery can be viewed.


Of course, the Netgear Nighthawk M1 MR1100 router also provides the ability to update the firmware online directly via the web interface. In the test device came such a firmware update directly after the first set up, the installation went quickly and easily. There is the possibility to make a backup of the settings before installing the update.


Good Wi-Fi performance


If you want to use the full Gigabit LTE performance, you should definitely use the RJ45 Gigabit LAN connection. The WLAN is gross at a maximum of 768 MBit/s fast, at about 1-2 meters distance between router and laptop, the bandwidth dropped in the test to about 500 to 600 MBit/s. These are very good values for a mobile WLAN router. WLAN range and speed are better than most other mobile hotspots, but a stationary LTE router such as the Huawei B715 router is, of course, a bit better. On request, the WLAN via the web interface can also be completely deactivated or operated only in the 2.4 GHz/only in the 5 GHz range.

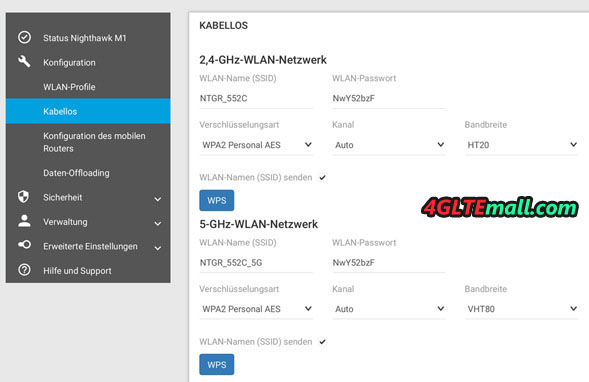
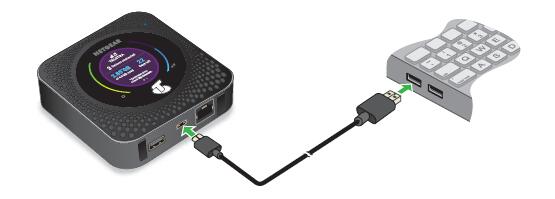
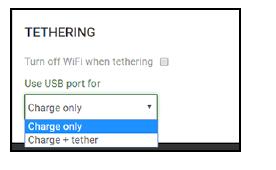
The Nighthawk M1 can simultaneously provide up to 20 devices with fast Internet, the device will operate both on 2.4 GHz and in the 5 GHz frequency range (802.11b/g/n/ac). The WLAN SSID and the password can be assigned separately for both frequency ranges. The transmission power can be set in the web interface in three stages. In the app or in the web interface, there is also the option to enable or disable the password display in plain text on the display of the Nighthawk M1. Also a nice feature: the device deactivates the WLAN on request, as soon as USB tethering is active.

Via the menu item “Data Offloading” you can use an existing LAN or WLAN network as Internet access, for example in the hotel or on the campsite. The integrated mobile modem is then deactivated. This feature is also known as “WLAN Extender”.

RJ45 LAN connection


The Netgear Nighthawk M1 MR1100 has an RJ45 Gigabit Ethernet LAN port. You can use this port to connect a computer or a switch to the Internet via cable, but there is also the option of using an existing Internet connection as an alternative to the integrated mobile modem (the LAN port then becomes a WAN -Port). In the test, the LAN interface worked perfectly.

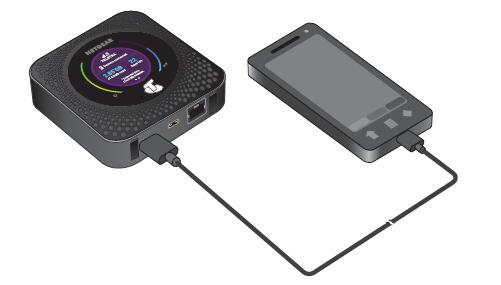
Battery with power bank function


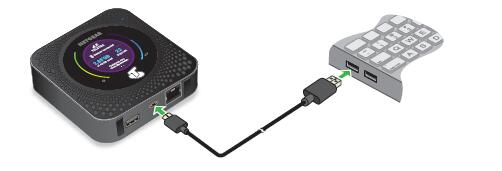
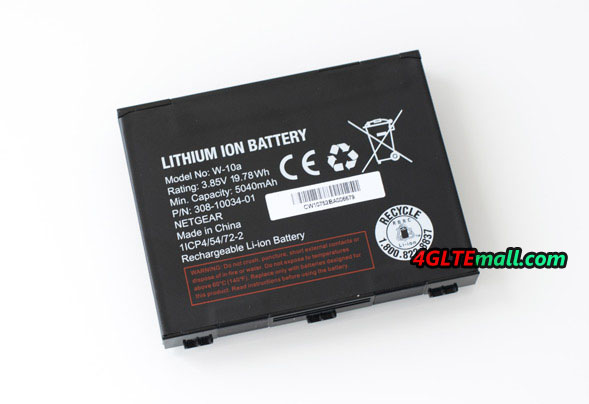
The battery of the Netgear Nighthawk M1 MR1100 offers a comparatively high capacity with 5,040 mAh. The manufacturer promises a useful life of up to 24 hours with “normal” use. In the test, this could be approximately confirmed. Under full load, ie with continuous streaming and when using the road with many radio cell and technology changes, the runtime should be lower. A replacement battery of the type W-10a cannot be found yet. Through the full-size USB port, you can use the Nighthawk M1 as a power bank and charge other devices such as a smartphone. The test worked smoothly in the test.

Conclusion for Netgear Nighthawk M1


It was already foreseeable, but after the test, it is definitely clear: the Netgear Nighthawk M1 MR1100 is by far the best mobile LTE router that you can buy at the moment. The technical equipment is outstanding, the modem does a very good job and not only offers huge maximum data rates but also gets often significantly more out of the cell than most other devices in worse conditions. The successful software and a top battery life are also highlights. So the powerful functions, unfortunately, mean it will have a proud price: around 459USD (unlocked version).

In the test, unfortunately, some disadvantages were found. We have to mention the partially incomprehensible behavior in LTE radio cells with activated carrier aggregation. Other devices use channel bundling more timely and much more effectively than the Nighthawk M1. Here, Netgear should release a firmware update to fix the issues. You could also criticize the lack of touchscreen as well as the quite high weight and the large dimensions. Both, however, can be tolerated in view of the otherwise outstanding performance. All in all, the Netgear Nighthawk M1 is the best mobile router for buy recommendation!

GlocalMe G3 Review – LTE Mobile Hotspot for Worldwide Use

There are many 4G Mobile WLAN routers available in the market now, but most of them have some application limit due to the network incompatibility if moving to another particular continent. Here we get a new gadget that provides a perfect solution for this trouble. The GlockalMe provides the G3 hotspot not only with the support of multiple frequency bands but also directly offers an integrated CloudSIM service that enables worldwide LTE usage at astonishingly fair prices.

GlocalMe G3: Appearance


The GlocalMe G3 is the most powerful mobile WLAN hotspot from the Chinese provider. The device looks like a very thick Apple iPhone 4, runs with a highly customized version of the Android operating system and comes with a very large touchscreen display(for a hotspot) therefore. In terms of price, the GlocalMe G3 is reasonably priced at around 199 USD, especially since 1.1 GB of data usable worldwide is already included in the purchase price.


In addition to the device itself, only one USB to MicroUSB charging cable is included. There is no power adapter, but you can use any ordinary power supply with the USB port. The GlocalMe G3 hotspot looks incredibly thick at first glance because there is a very strong battery with 5,350 mAh capacity. On the side of the device, there are two buttons for louder/quieter (whose functionality is unclear) and a power button. Processing, materials and the SIM card slot always make a decent impression.

GlocalMe G3: Dual-SIM Capable

The GlocalMe G3 is dual-SIM capable, and it has two nano SIM slots. This is a unique selling proposition for Mobile WLAN Hotspots and can be very convenient in many situations. In the test, the GlocalME G3 was working quickly and simply with Vodafone and Orange SIM cards: after a short press on the power button, it took only about half a minute for the router to be online. A quick-access menu allows you to easily switch between the two SIM cards and the virtual SIM card.


The operation is very easy and is done via the GlockalMe G3 touchscreen. By using the Android operating system you have the advantage of a “full-featured” keyboard, for example, to be able to change the WLAN name and the WLAN password. The display itself is of poor quality in terms of brightness, resolution and viewing angle stability in comparison with current smartphones, but for a mobile Wi-Fi hotspot, it is of course quite sufficient.

GlocalMe G3: CloudSIM in the test

The main highlight for the purchase of the GlocalMe G3 is probably the virtual SIM (CloudSIM), which allows the easy worldwide use of the device in addition to the dual SIM function. 1.1 gigabytes of the data volume is already included in the purchase; additional volume can be purchased if you create an account. All this can be done either via an app (for iOS and Android) or via the GlocalMe website.


GlocalMe offers the data volume in the form of various data packages. These are valid for different lengths of time (for example 30 days, 90 days or 365 days) and are available for different countries and continents. The prices seem surprisingly fair at first glance, so costs 1 GB world-wide data volume for 1 year € 29.90. If you only need data in Germany, you can buy eg 3 GB for 19 Euro or 1 GB for 7 Euro (each valid for 30 days).

In the test, the virtual SIM card was tried in Germany, the service worked easily and in the LTE network data rates up to about 25 MBit/s were measured in the download. The latencies (ping) were about 30 milliseconds and in the uplink about 5 Mbit/s were reached. These are not top scores, but for surfing and streaming HD videos, it is absolutely fine.


GlocalMe G3: Speeds

The speed test with the local SIM gave the GlocalMe G3 router a very bad picture. In LTE mode, a maximum of 35 MBit/s was possible via WLAN, in UMTS mode it was over at about 24 MBit/s. For comparison: under identical test conditions, an Apple iPhone 8 managed about 140 MBit/s in the downlink and about 68 MBit/s in the uplink via LTE, similar values were also provided by the Netgear AirCard 810 hotspot.


A positive feature is the good worldwide frequency band support. The GlocalMe G3 offers FDD LTE Band 1/2/3/4/5/7/8/9/17/19/29, TDD LTE Band 38/39/40/41, UMTS Band 1/2/4/5 / 6/8/9/19 and GSM 850/900/1800/1900.


GlocalMe G3 Wi-Fi and battery

The WLAN of the GlocalMe G3 is comparatively slow, according to the official specs, only the 802.11b/g/n standard on 2.4 GHz with a maximum of 72 MBit/s downlink is supported, but 5 GHz is not available. For comparison, other mobile hotspots in the price range usually offer dual-band WLAN with at least 300 MBit/s.


The battery provided an operating time of about 20 hours in the test, which is a very good value for a mobile Wi-Fi hotspot. If required, you can also charge other devices such as a smartphone via the full-size USB port, the GlocalMe G3 then becomes a power bank.


Others

Unlike most other mobile Wi-Fi hotspots, the GlocalMe G3 lacks many features. There are no connections for an external antenna, no MicroSD memory card slot, no RJ45 LAN connection and also a web interface, as it is usually known from mobile WLAN routers, is not present on the GlocalMe G3.


The software is extremely limited, many other usual settings such as a “LTE only” or “3G only” mode do not exist. Statistics on data consumption and information on the network used are only very limited visibility when using a local SIM. That does not necessarily have to be bad for the end customer – the GlocalMe G3 works well and does its job. However, this fact must be mentioned in this review and it would be nice if a possible successor would offer more configuration options.


Conclusion

The GlocalMe G3 is a very interesting mobile wireless router. Anyone who travels a lot in the world and often travels to different countries should take a closer look at the device. The prices for mobile data use with the virtual SIM card are very competitive, so that in most countries, the purchase of a national SIM card can be omitted. Also for the ease of use and the very good battery life, the GlocalMe G3 deserves praise.


For technology enthusiasts and those who value good technical equipment, the device is quite uninteresting. Although the many supported LTE frequency ranges, as well as the dual-SIM function, are to be positively emphasized, the comparably slow modem, the weak WLAN, and the few setting provide not a good impression. To summary, the GlocalMe G3 is a highly recommended hotspot with many unique selling points.


Netgear Nighthawk M1 Mobile Router Overview

Netgear has introduced the Nighthawk M1, a mobile LTE router with Ethernet port that can supply up to 20 devices with up to 1 GBit/s download speed at the Mobile World Congress 2018 in Barcelona (MWC). Many smartphones now offer hotspot capabilities, making it a mobile Wi-Fi access point for other smart devices. But if you want something more stable, faster and, above all, variable, you will not miss a dedicated mobile LTE router. The Nighthawk M1 from Netgear is top one of them. The Nighthawk M1 (MR1100) can provide up to 20 devices with mobile Internet access at a fast speed that is beyond the speed from a 4G smartphone.

The small pocket router Netgear M1 can forward up to 1 GBit/s. Connection can be obtained via the dual-band WLAN function or via a LAN output. Qualcomm provides the heart of the mobile router and contributes its share of the Nighthawk M1 with the MDM9x50. It supports nine LTE bands and makes uploading up to 150 Mbit/s possible.

Specifications of the NETGEAR Nighthawk M1:

  • Max. 1 Gbps download and 150 Mbps upload speeds
  • LTE Cat 16, 4-band CA and 4×4 MIMO: 1, 3, 7
  • Up to 4x carrier aggregation and support for LA in future firmware upgrades
  • LTE bands: 1, 3, 7, 8, 20, 28, 38, 40, 41
  • WCDMA: 1, 2, 5, 8
  • Chipset: Qualcomm MDM9x50
  • Dual-band / dual-concurrent WLAN
  • WLAN 802.11 b/g/n 2.4 GHz; WLAN 802.11 a/n/ac 5 Ghz
  • Large battery of 5040mAh

Netgear Nighthawk Router M1 at the MWC 2018

At the MWC in Barcelona, ​​the Nighthawk router M1 is not showed up for first. Actually, it was available in Australia and USA since 2017. Even though, the Nighthawk M1 in Europe comes with travel-friendly dimensions and a comfortable weight of 240 grams. The 2.4-inch LCD screen was easy to read even in the ungrateful exhibition hall light and showed the most important information. If the reception of the LTE network is not quite as stable as one would like it to be – for example in buildings, a 4G external antenna can help. Those who has surfed his smartphone power empty can use the small Netgear 4G router as a power bank. However, the large battery of 5040mAh can make Netgear Nighthawk router continuous working at 24 hours on average.

The first review quickly gives you confidence in the power of the Nighthawk M1. So you trust him quickly to survive even in the more robust travel assignment. With the powerful function, you should not expect at the very low price.

Price and availability

The Netgear Nighthawk M1 (MR1100) is now available at retail store www.4gltemall.com with price of just of 459.00USD with free 4G MIMO antenna of dual TS-9 connector. The unlocked Nighthawk M1 is in Telstra version, and it could be widely used in Germany, Austria and Switzerland, you can also use the unlocked Nighthawk router in Asia and Middle East areas. If you would travel to USA, you’d better use the unlocked ATT Nighthawk M1. With the Nighthawk M1 router, a removable lithium-ion battery (Li-Ion), a charger with USB-C cable and installation instructions are included.

Netgear Nighthawk M1- Best Mobile Router for Travel

Not all mobile devices are equipped with a SIM card. However, you have to know the latest Netgear Nighthawk M1 with high speed via LTE, the most important is that it’s an LTE advanced Pro router with SIM card slot and Ethernet port. The Nighthawk M1 could achieve download speed up to 1Gigabit, which is almost in the range of the 5G speed.


Nighthawk M1 from Netgear is known for a fleet router for mobile use, can it also be used at home or office. The 4G SIM router has a battery for mobile operation and can be loaded in every suitcase and almost every handbag. It simply gets his network from the air via the LTE wireless networks and transfers data for up to 20 devices. Thus, it should be the ideal companion for every trip.


Netgear introduced the Nighthawk M1 last year at the Consumer Electronics Show (CES) in Las Vegas.  The Australian carrier Telstra first introduced the Nighthawk router to its product range and then US carrier ATT followed. A year later, the device is finally available for users in Europe. Fortunately, the Netgear M1 comes out in Europe without a provider branding, so it’s unlocked can be operated in any network. In the US, the Nighthawk mobile router is limited to AT&T’s network while the Nighthawk router is limited to Telstra in Australia. The built-in modem supports the LTE Cat.16 and achieves maximum speeds of 1 gigabit per second (Gbps) in the download, at least in theory because only a few areas in Europe give such transmission rates. In addition, the transfer to mobile devices is possible via WLAN-ac or the built-LAN connection. The Netgear Nighthawk M1 always ensures fast Internet everywhere.


Anyone surfing through LTE should always keep an eye on current consumption so as not to exceed the high-speed volume. The Nighthawk M1 succeeds on a built-2.4-inch display. At the side of it are the status indicator for the current battery level and the strength of the network. If the latter is too low, the Netgear M1 will accept a maximum of two TS-9 antennas for reception. The user can control or setup the mobile 4G router through the web page or Netgear Mobile APP. The Netgear Mobile app can be used to make settings and even set up a parental control. The built-in battery is generously sized with 5040 mAh and can keep continuous working for a day and a night according to the manufacturer.

Netgear Nighthawk M1: Price and Availability

Since Telstra and ATT had already presented the product to the public for a long time, here now there are many unlocked Nighthawk M1 available in the market. The unlocked Nighthawk M1 is available on online store www.4gltemall.com with a price of around 459.00USD with free 4G MIMO Antenna with two TS-9 connectors. For the operation, it then still needs a micro-SIM card and a corresponding tariff. If you would take the Nighthawk M1 for travel, you’d better get an unlocked Nighthawk M1 router and get a valid SIM card from a network provider in the destination to work with the M1 router. But you will never get an unlocked Nighthawk M1 from the carriers in the destination country.

How to Use Netgear Nighthawk M1 Gigabit Router

This chapter provides an overview of Netgear Nighthawk M1 4GX Gigabit LTE Mobile Router features and instructions for how to set up your mobile router and connect to the Internet.

The chapter covers the following topics:

  • Get to Know Your Mobile Router
  • Install the SIM Card and the Battery
  • Download the NETGEAR Mobile App
  • Power On Your Mobile Router
  • Use the NETGEAR Mobile App to Set Up the Mobile Router
  • External Antennas


Get to Know Your Mobile Router

Your mobile router lets you create a WiFi access point in any location with cellular network coverage. Use a WiFi access point to connect your computer or mobile devices to your service provider’s mobile broadband network and connect to the Internet.

  • Rechargeable battery included with the mobile router
  • Wall socket using the AC adapter and USB cable
  • USB port on your computer Your mobile router can receive power from any of the following sources:


Top Front View

The following figure shows the top front view of the mobile router.


Power Button

Use the Power button to wake the mobile router and to power the device on and off.


Desired Result Action
Turn on the mobile router. Press and hold the Power button for three seconds.
Turn off the mobile router. Press and hold the Power button for five seconds.
Wake the router. Press and quickly release the Power button.
Switch between screens. Press and quickly release the Power button.


Status LED

The LED indicates the device’s connection status.

LED What the Pattern Means
Slow blue blink The Nighthawk M1 router is ready.
Fast blue blink The Nighthawk M1 router is transferring data.
Slow amber blink The Nighthawk M1 router is not ready.


LCD Screen

The LCD screen displays information shown in the following figure.


Rear View

The following figure shows the rear view of the mobile router.

The mobile router rear panel includes the following ports:

  • USB type A port. Connect a USB storage device or charge a smartphone.

For information about USB storage devices, see Connect a USB Storage Device in the article Netgear M1 Share Media and Storage.

For information about charging a smartphone, see see Use the Mobile Router to Jump Boost Another Device in How to Manage Netgear MR1100 Router Battery Usage and Charging.

  • USB type C port. Connect the USB type-C cable that came in the package to recharge the battery or for a tethered connection to a computer.

For more information about recharging the battery, see Recharge the Battery From a Wall Socket  and Recharge the Battery From a Computer USB Port in the article How to Manage Netgear MR1100 Router Battery Usage and Charging. .

A tethered connection to a computer lets you access the mobile router from a web browser without a WiFi connection. See Tethered Connection in How to Connect to the Netgear M1 Nighthawk Mobile Router.

  • Ethernet port. You can connect an Ethernet device to this port and you can offload your mobile Internet data. The Ethernet connection speed is about 500 Mbps.

When you are using an Ethernet connection, you can use the USB type C cable and the AC adapter to recharge the mobile router battery.

Note: You cannot use an Ethernet connection and use a tethered connection to access the mobile router at the same time.


For information about offloading data, see Offload Your Mobile Internet Connection in Manage Netgear M1 Internet Connection.

For information about how to use a charge-only tethered connection, see Use the USB Type C Cable to Charge Only in How to Manage Battery Usage and Charging.


Optional Accessories

The following optional accessories are also supported:

  • Optional micro SD card (sold separately)
  • Optional antennas (sold separately)

For more information, visit netgear.com/telstraaccessories.


Install the SIM Card and the Battery

To install the SIM card and the battery:

To obtain an activated micro SIM (3FF format) card, contact Telstra.

  1. Make sure that power to the mobile router is off.
  2. Remove the cover on the bottom of the mobile router.

Place your thumbs on the arrows on the cover and press down while sliding the cover up.

  1. Carefully slide the micro SIM card into the slot.
  2. Align the battery connectors and insert the battery.
  3. If you purchased a micro SD card, insert the card into the micro SD slot.
  4. Replace the mobile router cover.


Download the NETGEAR Mobile App

The NETGEAR Mobile app lets you set up the mobile router. After initial setup, you can use the app to view or change the mobile router settings. You can also use it to enable Arlo support, play and share media, and enable the travel router feature.

To download the NETGEAR Mobile app:

  1. Connect your mobile device to the Internet.
  2. Open a web browser.
  3. Visit http://netgear.com/mobileapp.
  4. Download the NETGEAR Mobile app.


Power On Your Mobile Router

To power on your mobile router:

  1. Press the Power button on your mobile router.

The LED lights blue.

  1. To view the WiFi name and password, press and release the Power button to toggle through the Nighthawk M1 router LCD displays.


Use the NETGEAR Mobile App to Set Up the Mobile Router

To set up the mobile router:

You must use the NETGEAR Mobile app to set up the mobile router.

  1. Launch the NETGEAR Mobile app.

The app prompts you to change the password for the admin user name and to change the WiFi name and WiFi password.

Note: The default password for the admin user name is admin. We strongly recommend that you change this password to a more secure password.

  1. Follow the onscreen instructions to set up your mobile router.


External Antennas

Using an external antenna might be recommended in areas of lower coverage to improve your device performance. MIMO Dual TS9 antennas are available from your retailer. Insert the connector carefully to avoid damage to your device.

How to Connect to the Netgear M1 Nighthawk Mobile Router

This chapter is about how to connect to Netgear M1 Nighthawk Mobile router, covering the following topics:

  • Connect to the Mobile Router Network
  • Use the NETGEAR Mobile App to Access the Mobile Router
  • Use a Web Browser to Access the Router


Connect to the Mobile Router Network

You can connect your computers and mobile devices to the mobile router WiFi network. You can also connect a computer to the mobile router through a tethered connection using the USB cable that came in the package with the mobile router.

Note: If you set up your computer to use a static IP address, change the settings so that it uses Dynamic Host Configuration Protocol (DHCP).

WiFi Connection

You can find and select the WiFi network or you can connect to the router’s WiFi network with Wi-Fi Protected Setup (WPS). For information about using WPS, see Use WPS to Connect to the Mobile Router WiFi Network in the article How to Specify Netgear Nighthawk MR1100 Mobile Router Network Settings.

.

To find and connect to the WiFi network:

  1. Make sure that the mobile router is powered on (its LED is lit).
  2. Check to make sure that WiFi is enabled on your computer or mobile device and search for WiFi networks.

Refer to the following table or the manual for your WiFi-enabled device for further details on searching for WiFi networks.


Device Instructions
 

Windows computer

Click the Internet Access icon, which is usually found on the bottom right side of your screen.
Mac computer Go to the WiFi menu and select Network.
Mobile devices Go to the Settings menu and tap the WiFi icon.
  1. Select the WiFi name displayed on your Nighthawk M1 screen.
  2. Enter the WiFi password exactly as shown on the Nighthawk M1 screen. The password is case-sensitive.

Your computer or mobile device connects to the WiFi network.


Tethered Connection

To connect the mobile router to the USB port on your computer:

Attach one end of the USB (type C) cable to the mobile router and plug the other end into the USB port on your computer.

Your computer automatically connects to the mobile router LAN (local area network). The first time you connect this way, your computer might display notifications about detecting a new device.

Note: If you want to use data offloading with a tethered connection, use WiFi offloading instead of Ethernet offloading. Tethered access is not supported during Ethernet offloading. For more information about offloading, see Offload Your Mobile Internet Connection in the article about Manage Netgear M1 Internet Connection.


Use the NETGEAR Mobile App to Access the Mobile Router

You use the NETGEAR Mobile app to set up the mobile router. After initial setup, you can launch the app again and use it to log in to the mobile router to view or change its settings.

To log in to the mobile router from the NETGEAR Mobile app:

  1. On your smartphone, connect to the mobile router’s WiFi network.
  2. Launch the NETGEAR Mobile app.

You might be prompted to enter the admin password. During setup, you were prompted to change this password (the default password is admin).

  1. If prompted, enter the admin password.

The app displays the following information:

  • Notifications
  • Data usage as provided by your carrier
  • Your cellular and WiFi signals and battery
  • Current WiFi band (swipeable)
  • WiFi name and password
  • Connected devices.
  1. Swipe down.

The dashboard displays the icons shown in the following table.


Use a Web Browser to Access the Router

When you connect to the network (either with WiFi or with a tethered connection), you can use a web browser to access the router, to view and change its settings.

To log in to the router from a web browser:

  1. From a computer that is connected to your network, launch a web browser.
  2. Enter http://m.home or http://192.168.1.1. A login window opens.
  3. Enter the router user name and password.

The user name is admin. The user name and password are case-sensitive.

How to Manage Netgear MR1100 Router Battery Usage and Charging

This chapter introduces some simple application and setting for Netgear Nighthawk MR1100, including the following sections:

  • Extend Battery Life
  • Change the LCD Screen Display
  • Recharge the Battery
  • Use the Mobile Router to Jump Boost Another Device
  • Battery Tips
  • General Battery Safety
  • Appropriate Batteries and Chargers
  • Battery Disposal


Extend Battery Life

The mobile router, by default, is configured to optimize battery life. If your mobile router is plugged in for an extended period of time, the mobile router automatically reduces charging levels to help protect battery life.

The following factors affect battery life:

  • Standby time
  • Data throughput
  • Mobile broadband signal strength (the better the signal, the longer the battery life)
  • Dual-band WiFi (when all of your devices support 5 GHz WiFi, dual-band WiFi allows faster downloads but uses more power)
  • Guest WiFi, when enabled, uses more power.


To extend the battery life, use any of the following methods:

  • Adjust WiFi settings.
  • Adjust display settings.
  • Use a tethered USB connection to your computer.
  • WiFi range


Change the LCD Screen Display

You can change the brightness and the time-out for the LCD.

Change the LCD Screen Time-Out and Brightness From the NETGEAR Mobile App

To change the LCD screen time-out and brightness:

  1. On your smartphone, connect to the mobile router’s WiFi network.
  2. Launch the NETGEAR Mobile app.
  3. Swipe down.The dashboard displays.
  4. Tap Settings.The Settings page displays.
  5. To change the screen time-out, select the number of minutes for the screen time-out.
  6. To change the screen brightness, move the slider.


Change the LCD Screen Time-Out and Brightness From a Web Browser

To change the screen time-out:

  1. From a computer that is connected to your network, launch a web browser.
  2. Enter http://m.home or http://192.168.1.1. A login page displays.
  3. Enter the administrator login password. The password is case-sensitive.The dashboard displays.
  4. Select Settings > Advanced Settings > Device.The Device page displays.
  5. To change the screen time-out, select the number of minutes for the screen time-out.
  6. To change the screen brightness, move the slider.
  7. Click the Apply button. Your settings are saved.


Recharge the Battery

The battery comes partially charged. You can recharge the battery from a wall socket or from the USB port on your computer. Recharging from a wall socket is faster than recharging from a USB port. The mobile router supports Quick Charge 2.0 technology. You can charge the mobile router with a Quick Charge–certified adapter, which charges the battery up to 75 percent faster than regular power adapters.

Turn off USB tethering if you only want to charge your mobile router with your computer. For more information, see Turn Off USB Tethering in Internal Access Control.


Recharge the Battery from a Wall Socket

To recharge the battery from a wall socket:

  1. Attach one end of the micro USB cable to the connector on the right on the mobile router and attach the other end to the wall charger (included).
  2. Plug the wall charger into a wall socket. A lightning bolt appears on the Battery icon when the battery is charging. The Battery icon on the LCD indicates when the battery is fully charged and a notification displays.

Note: The battery continues to charge when the mobile router is powered off.


If your battery does not charge, check the following:

  • Is the mobile router hot? If you are in a low-coverage area, are transferring a lot of data, or left the mobile router in a hot location, the internal temperature of the mobile router can rise above 45°C. In these conditions, the battery cannot be charged due to safety limits with lithium-ion battery technology.
  • Make sure that the USB cable and the AC wall charger are connected securely and are working correctly.
  • If the wall socket is controlled by a switch, make sure that the switch is in the power-on position.


Recharge the Battery from a Computer USB Port

To recharge the battery from the USB port on your computer:

  1. Attach one end of the micro USB cable to the mobile router and plug the other end into the USB port on your computer.

The Battery icon includes a lightning bolt to indicate that the battery is charging.

The Battery icon on the LCD indicates when the battery is fully charged and a notification displays.

Note: The LCD goes into sleep mode after a set time to extend battery life. To wake up the LCD, press and quickly release the Power button.


Use the USB Type C Cable to Charge Only

You can log in to the mobile router and specify a setting so that the USB type C cable is used only for charging and not to access the mobile router using a web browser. You might want to do this if you are using the Ethernet port and a wall socket is not available to charge the mobile router.

To specify a USB type C cable charge-only setting:

  1. From a computer that is connected to your network, launch a web browser.
  2. Enter http://m.home or http://192.168.1.1. A login window opens.
  3. Enter the router user name and password. The user name is admin. The user name and password are case-sensitive. The mobile router dashboard displays.
  4. Select Setup > Router Setup. The Router Setup page displays.
  5. In the TETHERING section, select Charge only.

Your settings are saved. When you connect the USB type C cable, the mobile router battery charges, but you cannot use the tethered connection to access the mobile router with a web browser.


Use the Mobile Router to Jump Boost another Device

If your smartphone or other device is low on or out of battery power, you can give it a boost by connecting it to the mobile router’s USB port A connector.

Battery Tips

The following tips explain best practices for battery usage and care:

  • Charge batteries in a room-temperature environment, which is generally between 68°F and 79° F (20°C and 26°C). Charging might be temporarily disabled if the battery temperature exceeds 113°F (60°C). If the battery temperature is hot but less than 113°F (60°C), the battery can charge at a slower rate than usual.
  • If a battery exhibits significantly shorter runtime or discharge capacity compared to when it was new, it reached the end of its reasonable lifetime. Consider replacing it.
  • If a battery does not charge or exhibits excessive charging time, it is possible that it reached the end of its life and might need to be replaced.
  • All batteries degrade and lose charge capacity over time as a result of use or storage and must eventually be replaced.
  • Batteries are best stored in a cool, dark, dry place. Avoid storage in direct sunlight and in vehicles parked outdoors.
  • Batteries might get warm while charging and discharging. This is normal behavior for all batteries.
  • Use the AC adapter and the USB cable that came with this device.
  • Use the latest firmware. Check for updates on a regular basis.
  • Device performance and runtime are affected by workload or usage. Higher workloads or usage can lead to higher battery temperatures and faster battery power consumption.
  • Streaming large amounts of data affects the power consumption and reduces the operating time of the battery.

General Battery Safety

Observe the following guidelines:

  • Stop using a battery if its case appears damaged, swollen, or compromised. Examples include, but are not limited to, leaking, odors, dents, corrosion, rust, cracks, swelling, melting, and scratches.
  • Do not expose batteries to fire or other heat generating environments.
  • Do not place the battery or the device in areas that might get hot. Examples include, but are not limited to, on or near a space heater, cooking surface, cooking appliance, iron, radiator, or fireplace.
  • Do not get the battery or the device wet. Even though it might dry and appear to operate normally, the circuitry can slowly corrode and defeat its safety circuitry.
  • Do not crush, puncture, deform, or put a high degree of pressure on the battery, which can cause an internal short circuit, resulting in overheating.
  • Avoid dropping the battery or the device. Dropping it, especially on a hard surface, might cause damage to the battery and the device. If you suspect damage to the battery or the device, replace it.
  • When the battery is outside the device, do not allow the battery to come in contact with metal objects, such as coins, buttons, jewelry, or tools.
  • Do not disassemble or modify batteries. Do not use a battery for anything other than its intended purpose.


Appropriate Batteries and Chargers

Observe the following guidelines:

  • Use only approved batteries in the device. Purchase only products and accessories recommended by NETGEAR or your carrier. Use of unapproved batteries, products, or accessories will void your warranty.
  • Do not use incompatible batteries and chargers. Some websites and second-hand dealers, not associated with reputable manufacturers and carriers, might sell incompatible or even counterfeit batteries and chargers.
  • If you are unsure about whether a replacement battery or charger is compatible, contact NETGEAR.
  • Quick Charge 2.0–enabled devices must be paired with Quick Charge 2.0–certified adapters.


Battery Disposal

Follow disposal regulations in your region, and handle batteries safely. Observe the following guidelines:

  • Disposal regulations vary by region. Dispose of old batteries and equipment in compliance with your local regulations.
  • Proper disposal might include recycling programs for batteries, cell phones, or other electronic waste.
  • Do not dispose of batteries in a fire.