This chapter describes the Telstra Nighthawk M1 router settings for administering and maintaining your router and home network.
The chapter includes the following sections:
- View the Network Status
- View Mobile Router Device Status
- View WiFi Details
- View a Network Map
- View Connected Devices
- Update the Mobile Router Firmware
- Change the admin Password
- Manage SMS Messages
- LED Settings
- Back Up and Restore the Mobile Router Settings
- Factory Reset
- Reboot the Mobile Router
- Power Off the Mobile Router
- View Details About Your Mobile Router
View the Network Status
To view the network status:
- From a computer that is connected to your network, launch a web browser.
- Enter http://m.home or http://192.168.1.1.
A login page displays.
- Enter the administrator login password.
The password is case-sensitive.
The dashboard displays.
- Select SETTINGS> Mobile Router Status > ACCOUNT.
The Network Status page displays.
View Mobile Router Device Status
You can view details about the status of your modem router.
View Mobile Router Device Status From the NETGEAR Mobile App
To view device status:
- On your smartphone, connect to the mobile router’s WiFi network.
- Launch the NETGEAR Mobile app.
- Swipe down.
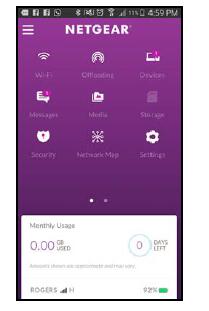
The dashboard displays.
- Tap Settings.
The Settings page displays.
- Tab About.
The About page displays.
View Mobile Router Device Status From a Web Browser
To view device status:
- From a computer that is connected to your network, launch a web browser.
- Enter http://m.home or http://192.168.1.1.
A login page displays.
- Enter the administrator login password.
The password is case-sensitive.
The dashboard displays.
- Select SETTINGS > Mobile Router Status > DEVICE.
The Device Status page displays.
View WiFi Details
To view WiFi status:
- From a computer that is connected to your network, launch a web browser.
- Enter http://m.home or http://192.168.1.1.
A login page displays.
- Enter the administrator login password.
The password is case-sensitive.
The dashboard displays.
- Select SETTINGS > Mobile Router Status > WIFI DETAILS.
The WIFI DETAILS page displays.
View a Network Map
The network map shows the status of your mobile router network and your Internet connection.
View a Network Map from the NETGEAR Mobile App
To view a network map:
- On your smartphone, connect to the mobile router’s WiFi network.
- Launch the NETGEAR Mobile app.
- Swipe down.
The dashboard displays.
- Tap Network Map.
The network map displays.
View a Network Map from a Web Browser
To view a network map:
- From a computer that is connected to your network, launch a web browser.
- Enter http://m.home or http://192.168.1.1.
A login page displays.
- Enter the administrator login password.
The password is case-sensitive.
The dashboard displays a network map.
View Connected Devices
You can view a list of devices that are connected to your mobile router.
View the Connected Devices on the LCD
To view the connected devices from the LCD:
To wake the device, press the Power button.
The screen shows the number of connected devices.
View the Connected Devices from the NETGEAR Mobile App
To view the connected devices from the NETGEAR Mobile app:
- On your smartphone, connect to the mobile router’s WiFi network.
- Launch the NETGEAR Mobile app.
- Swipe down.
The dashboard displays.
- Tap Connected Devices.
A list of connected devices displays.
View the Connected Devices from a Web Browser
To view the connected devices from the mobile router web page:
- From a computer that is connected to your network, launch a web browser.
- Enter http://m.home or http://192.168.1.1.
A login page displays.
- Enter the administrator login password.
The password is case-sensitive.
A list of devices connected to the main WiFi and guest WiFi networks displays on the dashboard.
If you notice a WiFi device that you do not recognize, you can block that device from connecting to your WiFi network.
Update Netgear Nighthawk M1 Mobile Router Firmware
The mobile router automatically checks for new firmware updates. If an update becomes available, the mobile router displays an alert. You can also check for updates manually without receiving an alert.
Update Firmware From an Alert
To update the firmware:
- Open the alert.
- Click the Download button.
When the download completes, the mobile router displays an alert with an Install now button.
- Click the Install now button.
The update installs. The mobile router reboots automatically and uses the new software.
Update Firmware from the NETGEAR Mobile App
To update firmware using the NETGEAR Mobile app:
- On your smartphone, connect to the mobile router’s WiFi network.
- Launch the NETGEAR Mobile app.
- Swipe down.
The dashboard displays.
- Tap Settings > Firmware.
The Firmware page displays.
- Tap CHECK FOR UPDATE.
The mobile router checks for firmware updates. If an updated is available, it is automatically downloaded.
- Tap INSTALL UPDATE.
After the update install completes, a success message displays.
Update the Firmware from the Web Page
To update firmware using the mobile router web page:
- From a computer that is connected to your network, launch a web browser.
- Enter http://m.home or http://192.168.1.1.
A login page displays.
- Enter the administrator login password.
The password is case-sensitive.
The dashboard displays. If a firmware update is available, a blue INSTALL NEW FIRMWARE link displays on the right.
- Click the INSTALL NEW FIRMWARE link.
The update downloads.
- Follow the onscreen instructions to install the update.
After the update completes, the mobile router reboots.
Change the admin Password
To change admin password:
The admin password is used to log in to the mobile router with the user name admin. This password is not the one that you use for WiFi access.
When you used the NETGEAR Mobile app to set up the mobile router, you changed the admin password. To change it again, you must use web browser access from a computer. The ideal password contains no dictionary words from any language and contains uppercase and lowercase letters, numbers, and symbols.
- From a computer that is connected to your network, launch a web browser.
- Enter http://m.home or http://192.168.1.1.
A login page displays.
- Enter the administrator login password.
The password is case-sensitive.
The dashboard displays.
- Select Settings > Administration > Set Password.
The Set Password page displays.
- Enter your current password in the Old Password field.
- Enter your new password in the New Password field and the Repeat Password field.
Your settings are saved.
Manage SMS Messages
You can view messages from the NETGEAR Mobile app or the mobile router web page.
Manage Messages from the NETGEAR Mobile App
To manage SMS messages from the NETGEAR Mobile app:
- On your smartphone, connect to the mobile router’s WiFi network.
- Launch the NETGEAR Mobile app.
- Swipe down.
The dashboard displays.
- Tap Messages.
The Messages page displays.
- To read the full text of a message, tap the message.
- To delete a message, tap and hold the message to select it, and then tap the Delete button.
The message is deleted.
View or Delete Messages from a Web Browser
To view or delete SMS messages from the mobile router web page:
- From a computer that is connected to your network, launch a web browser.
- Enter http://m.home or http://192.168.1.1.
A login page displays.
- Enter the administrator login password.
The password is case-sensitive.
The dashboard displays a list of messages, showing the first portion of the text.
- Click a message to read the full text.
- To delete a message, click the message and then click the Delete button.
The message is deleted.
LED Settings
You can turn the LED blinking off and on.
To turn the LED blinking on or off:
- From a computer that is connected to your network, launch a web browser.
- Enter http://m.home or http://192.168.1.1.
A login page displays.
- Enter the administrator login password.
The password is case-sensitive.
The dashboard displays.
- In the upper right corner, click the menu icon.
The menu opens.
- Select LED Settings.
The LED Settings page displays.
- Select the Enable LED blinking or Disable LED blinking radio button.
- Click the Apply button.
Your settings are saved.
Back Up and Restore the Mobile Router Settings
You can back up and restore mobile router settings. Backing up and restoring is useful if you use more than one device and you want the same settings on all of your devices. You can also save your settings before resetting to factory defaults or changing the settings.
Back Up the Mobile Router Settings
To back up mobile router settings:
- From a computer that is connected to your network, launch a web browser.
- Enter http://m.home or http://192.168.1.1.
A login page displays.
- Enter the administrator login password.
The password is case-sensitive.
The dashboard displays.
- Select Settings > Administration > Backup.
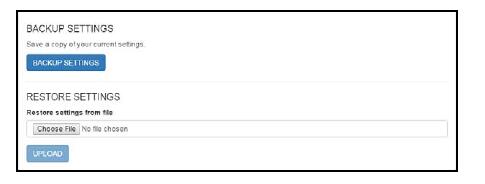
- Click the BACKUP Settings button.
By default, the file (export.cfg) is saved to your Downloads folder.
Restore the Mobile Router Settings
To restore mobile router settings:
- From a computer that is connected to your network, launch a web browser.
- Enter http://m.home or http://192.168.1.1.
A login page displays.
- Enter the administrator login password.
The password is case-sensitive.
The dashboard displays.
- Select Settings > Administration > Backup.
- Select the export.cfg file to restore using one of the following methods:
- To browse and select a local file, click the Choose File button.
- To select a backup file from the network, click the UPLOAD button.
By default, mobile router setting files are saved to your Downloads folder.
- Click the Open button.
Your mobile router is restored with the imported file settings.
Factory Reset
You can return the mobile router to its factory settings.
Factory Reset From the NETGEAR Mobile App
To reset the mobile router and return it to its factory settings:
- On your smartphone, connect to the mobile router’s WiFi network.
- Launch the NETGEAR Mobile app.
- Swipe down.
The dashboard displays.
- Tap Settings > Firmware.
The Firmware page displays.
- Tap PERFORM FACTORY RESET.
- Tap YES.
The mobile router resets and returns to its factory settings.
Factory Reset from a Web Browser
To perform a factory reset:
- From a computer that is connected to your network, launch a web browser.
- Enter http://m.home or http://192.168.1.1.
A login page displays.
- Enter the administrator login password.
The password is case-sensitive.
The dashboard displays.
- Select Settings > Administration > Factory Reset.
The Factory Reset page displays.
- Click the Factory Reset button.
- When prompted, click the Yes button to confirm.
The mobile router resets and returns to its factory settings.
Factory Reset Using the Reset Button
You must remove the cover on the bottom of the mobile router to access the Reset button.
To perform a factory reset using the Reset button:
- Make sure that the mobile router LED is lit to indicate that it is receiving power from the battery.
- Remove the cover on the bottom of the mobile router.
- Place your thumbs on the arrows on the cover and press down while sliding the cover up.
- Leave the battery in place.
- Locate the Reset button.
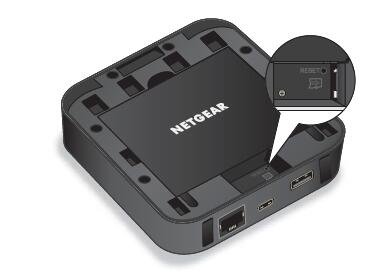
- With a sharp object such as a paperclip, press and hold the Reset button for five seconds. The mobile router returns to factory settings.
- 7. Replace the cover on the back of the mobile router.
Reboot the Mobile Router
You can reboot the mobile router from the NETGEAR mobile app or from a web browser.
Reboot the Mobile Router From the NETGEAR Mobile App
- On your smartphone, connect to the mobile router’s WiFi network.
- Launch the NETGEAR Mobile app.
- Swipe down.
The dashboard displays.
- Tap Power.
The Power Options page displays.
- Tap REBOOT DEVICE.
The mobile router reboots.
Reboot the Mobile Router From a Web Browser
To reboot the mobile router:
- From a computer that is connected to your network, launch a web browser.
- Enter http://m.home or http://192.168.1.1.
A login page displays.
- Enter the administrator login password.
The password is case-sensitive.
The dashboard displays.
- In the upper, right corner, click the menu icon.
- The menu opens.
- Select Reboot.
- When prompted, click the REBOOT button. The mobile router reboots.
Power Off the Mobile Router
You can use the Power button on the mobile router to turn it off, or you can log in to the mobile router with a browser and shut down the mobile router.
Power Off the Mobile Router Manually
Press and hold the Power button on the device for a few seconds.
Power Off the Mobile Router From the NETGEAR Mobile App
- On your smartphone, connect to the mobile router’s WiFi network.
- Launch the NETGEAR Mobile app.
- Swipe down. The dashboard displays.
- Tap Power. The Power Options page displays.
- Tap POWER OFF DEVICE. The mobile router turns off.
Power Off the Mobile Router From a Web Browser
- From a computer that is connected to your network, launch a web browser.
- Enter http://m.home or http://192.168.1.1.
A login page displays.
- Enter the administrator login password.
The password is case-sensitive.
The dashboard displays.
- In the upper right corner of the page, click the menu icon.
The menu opens.
- Select Power Off.
- When prompted, click the SHUTDOWN button.
The mobile router powers off.
View Details About Your Mobile Router
You can view details about your device such as the model number, software version, and IMEI (International Mobile Equipment Identity).
View Mobile Router Details From the NETGEAR Mobile App
- On your smartphone, connect to the mobile router’s WiFi network.
- Launch the NETGEAR Mobile app.
- Swipe down.
The dashboard displays.
- Tap Settings > About.
The About page displays.
View Mobile Router Details from a Web Browser
- From a computer that is connected to your network, launch a web browser.
- Enter http://m.home or http://192.168.1.1.
A login page displays.
- Enter the administrator login password.
The password is case-sensitive.
The dashboard displays.
- Select Settings > About. The ‘About’ page displays.